About a month ago, I thought I would upgrade to an ultrawide monitor. I wanted some more screen real estate, and because I’m still running an M1 MacBook Air, multiple external displays were a no-go. I settled on a curved 34" 1440p panel that allowed me to dock my laptop and all my peripherals to the monitor itself. The screen was denser than the monitor I used before—109 pixels per inch compared to 92 pixels per inch—so I was glad to get a boost in clarity as well. I waited the two days of shipping in anticipation, set up the monitor, hooked my laptop up, and… wait, why is the UI so small?
Oh, duh, it’s because of the pixel density! A higher density means the panel is cramming more pixels into a smaller space, and because the UI is based on pixels and not the screen’s actual dimensions, the UI will appear smaller as a result. No problem, I’ll just go to the settings and bump the UI size up a bit to compensate. But you will soon figure out, as did I, that MacOS doesn’t have any sort of fractional UI scaling for low-DPI screens. You’re stuck with 1x scaling or 2x scaling and nothing in between unless you want your UI to look terrible.
This smaller UI ended up being hard enough on my eyes that I would get a headache within a half hour of using it. And all the proposed solutions I found to scale the UI resulted in blurry text and icons that also gave me a headache. I ended up lugging the monitor to UPS for a return. I just couldn’t make it work.
So, I’m writing this to make sure anyone looking to buy an external monitor for MacOS doesn’t fall into the same trap as I did. This journey will be much more complicated than you think—it involves pixel density, viewing distance, resampling, anti-aliasing, fractional scaling, pixel ratios, and DP Alt Mode lanes. But you’ll also learn a thing or two about MacOS and monitors as a result.
The TL;DR version
At the highest level, this is what you need to do to find a monitor that works well with MacOS scaling depending on your needs:
- Determine whether your desired monitor setup is compatible with your Apple device’s hardware.
- Find a screen with a comfortable UI size at your viewing distance. This could be your laptop screen, your current monitor, or a friend’s monitor.
- Calculate the pixel density of that screen (or use the “looks like” equivalent if the screen is high-PPI). Use an online tool or do the math yourself.
- Either buy a monitor that is that is exactly 1x or 2x that pixel density or buy a monitor that is roughly twice that pixel density and scale the UI to your liking.
Or, alternatively:
- Buy an Apple display.
As for anything, this is not the solution, but a solution, and you can get away with using other monitors if you are willing to take the tradeoffs. I’ll go into detail on each step in the process, explaining what you need to do and what concessions you can make. You’ll hear me using a bunch of terms to talk about monitors—1080p, 4k, PPI, retina—and they’re all different ways to describe how many pixels are in a monitor. If you’re confused, I made this graphic to give some context.

The current state of UI scaling on MacOS
First, let’s talk a bit about how UI scaling works on MacOS. If you’re already familiar or just want some practical advice, feel free to skip this section, but you may miss out on some helpful context.
Ever since the debut of the iPhone 4 in 2010, Apple has been obsessed with displays that have pixels that are indistinguishable to the naked eye. They call this a “retina” display, and Apple has put retina panels on their devices ever since. These panels are all around 218 pixels per inch, meaning if you measured out an inch of screen with a ruler, you would count 218 pixels along that ruler. If Apple just rendered its user interface on these retina displays like they did on their non-retina displays—ones that are about 90 to 110 pixels per inch—it would feel microscopic. The UI, which is primarily sized by pixels, would appear much smaller because there are much more pixels per inch, about twice the (linear) pixels of a normal monitor.
To address this, Apple renders the UI on these retina displays at double scale, which means that an icon with a specified width of 20 pixels would instead take up 40 pixels. This makes the UI twice as big, and with Apple’s super dense retina displays, this works out perfectly. And Apple makes all of their displays the same pixel density of 218 pixels per inch, so Apple has designed MacOS to work best with this exact pixel density.
However, this is presented a little oddly on MacOS. Instead of showing UI scale as a percentage like Windows—200% scale versus 100% scale—MacOS presents it as a “looks like” resolution. If you’re on a 4k screen with a “looks like” resolution of 1080p, your UI would be exactly the same size as a 1080p monitor of the same dimensions. So, if you’re setting up a new 4k or 5k monitor and see values of 1080p or 1440p, know that the monitor isn’t actually displaying at that resolution, but is instead scaling the UI up 2x from that base resolution. You are still getting the best fidelity you can out of the monitor.
This is how MacOS handles scaling. Instead of scaling everything natively by changing the actual pixel values of the UI, it instead renders the UI at one of these base “looks like” resolutions, doubles it, then downscales the resulting image to fit your screen’s dimensions. For example, if you have a 4k monitor and choose a 2560x1440p resolution, the UI gets doubled to 5120x2880, then downscaled to 3840x2160.
A few things to note here. First, if you use one of these fractional scaling options, you are rendering a larger screen than is strictly necessary for your monitor. For the above example, you are rendering 75% more pixels than if you just stuck with the native retina 2x scaling. This gets better the closer to native resolution you go. However, keep in mind that this has at most a nominal effect on your GPU, and unless you’re using non-native scaling on multiple monitors at high refresh rates, you will likely not notice a difference.
Second, your computer will have to go through an extra step of downscaling the resulting screen to fit your monitor. Like the first note, this will likely have an unnoticeable effect on your GPU, but what matters more is the visual artifacting, usually called “blurriness” that arises from non-integer downscaling.
Let me illustrate this: with non-integer downscaling, you are essentially putting one grid over another grid of a different size. If you take a 1920x1080 grid and a 2560x1440 grid and resize them to take up the same total space, you will notice that many of the pixels overlap each other:
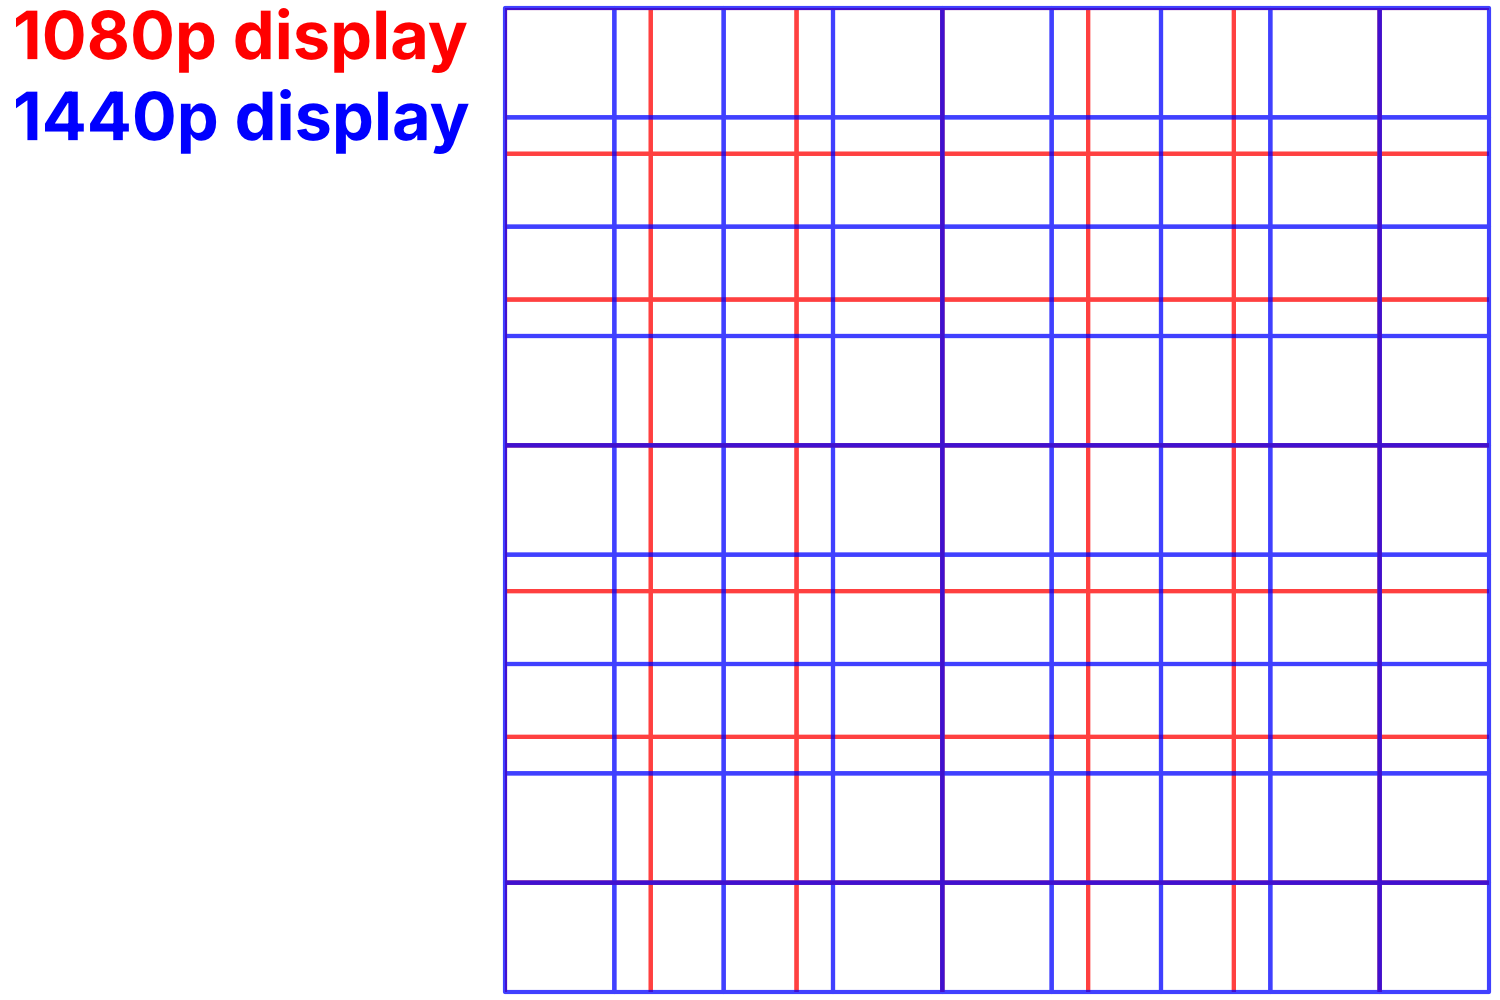
Do you see all of those wonky gaps? Look at the red pixel one in from the top-left—which of the four overlapping blue pixels would you choose to display that pixel? Apple’s algorithms for doing this well are complicated and fine-tuned, but even if you have the world’s best downscaling algorithm, you will never perfectly recreate the original image. This means some thin and complicated objects like text and icons may appear blurry compared to their perfect 2x-upscaled counterparts. This artifacting usually gets worse the farther from 2x scaling you stray.
But on high-PPI displays, many people don’t even notice a drop in image quality. With more pixels to play around with, any artifacting that downscaling produces will likely be too small or subtle to notice. Sure, some people with especially sensitive eyes may get irritated by this, but I wouldn’t be too concerned unless your work demands pixel accuracy.
Technically, you can still use this sort of scaling on low-PPI displays. While it isn’t supported officially on MacOS, you can still do it through an app called BetterDisplay. But the scaling artifacts introduced are much more noticeable, and using display scaling creates unmistakably fuzzier text and icons. And because BetterDisplay forces a 2x resolution scaling, you are rendering 4x the pixels than needed as opposed to the ~1.75x at worst with a high-PPI monitor. And at this point, high-PPI monitors have lowered enough in price that they make sense for most people, espeically if you don’t care about high refresh rates.
Step 1: confirm hardware compatibility
You first have to make sure your desired setup is compatible with your device on the hardware level. Most setups work fine on most Apple devices, but when you start to push the boundaries—say, two 4K displays or a high-PPI high-refresh panel—there are some considerations.
The first is making sure your device can support the number of monitors you intend to have. M1/M2 MacBook Airs (and the 13-inch MacBook Pro) only support one external display while the rest support two. You can get away with multiple displays on those models by using a DisplayLink dock, but those are clunky and require software, so I would just buy a newer model instead.
The second is making sure you have enough bandwidth for all that video data. Generally, Apple Silicon computers can support most monitors, but some specific devices drop support when you move into Hi-DPI panels with high refresh rates. M1/M2 computers are capped at a 60hz refresh rate for 4k and higher over HDMI; you can get around this by using a specific USB-C to HDMI 2.1 adapter with updated firmware or by using DisplayPort through a USB-C cable. Additionally, most USB-C docks using DP Alt Mode only support 4k at 60hz, so you have to get a more expensive and actively-powered Thunderbolt or USB 4 dock for anything beyond that.
Step 2: find your preferred PPI
Next, you need to settle on a pixel density that you like the best, often expressed in pixels per inch, or PPI. To find what PPI works best for you, use either an existing external monitor you like or your Apple device’s own screen. What’s important is that you place the screen at the distance you will be from your actual monitor; a smaller UI scale, meaning a higher PPI, will feel more comfortable on a laptop one foot away from your face versus a monitor two or three feet away.
If your test screen is low DPI and you like the UI scaling, just use the actual dimensions of your monitor in your PPI calculations. If your screen is high-PPI like an Apple display, you can futz around with the different scaling options they give you. On the Display page in Settings, Apple gives you a few options, ranging from “larger text” to “more space”:
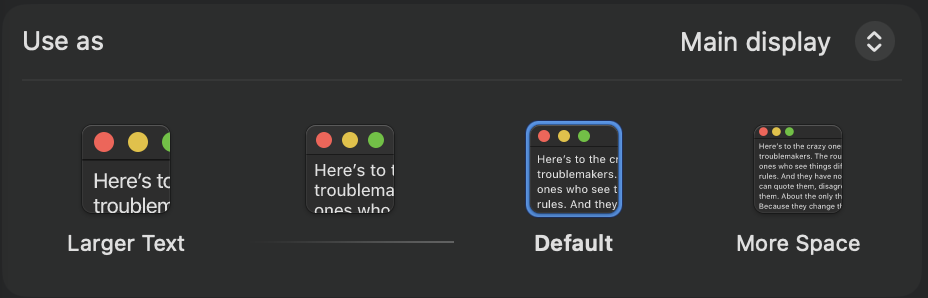
Mess around with the scaling until you find one that works at your viewing distance. If those scaling options aren’t fine-grained enough, you can click “Advanced” and toggle “Show resolutions as list” to get some more options. Once you’re satisfied, hover over the option you chose and a “looks like” resolution will appear. Use that for your dimensions.
Once you have your dimensions, note down the horizontal pixel count, the vertical pixel count, and your screen’s diagonal length. For me, I got my values from the display I am upgrading from: a 24" 1920x1080 monitor. This UI size looks the best to me at a viewing distance of 2 feet.
Step 3: calculate your monitor’s PPI
Once you have the dimensions—a horizontal pixel count, a vertical pixel count, and the diagonal size of your monitor—plug them into a PPI calculator to get the PPI for that display. The math is easy enough if you want to do it yourself. Just use the Pythagorean formula: add together the squares of the horizontal pixel count and the vertical pixel count, take its square root, then divide it by the screen’s diagonal length. It will typically be around 90-120 PPI, and it will be the baseline for which you’ll base your monitor search on. My 1080p 24" monitor comes out to 92 PPI, which is a lower density than most people like. Many people prefer a PPI closer to 110, exactly half of Apple’s retina pixel density.
Step 4: buy a monitor at the right PPI
It’s finally time to go shopping for a new monitor. Whether you are buying a non-retina display (1440p or below; 1x scaling) or a retina display (4k and above; 2x scaling) will affect the kinds of choices you have.
For low-PPI displays, your only option is to buy a monitor that exactly matches the PPI you calculated. Remember what I said earlier about fractional scaling, that it both isn’t officially supported on low-PPI monitors and looks pretty terrible? This means you don’t have any wiggle room. If you like 92 PPI, get something very close to 92 PPI, and the same for 110 PPI. This is the mistake I made buying my first monitor.
For high-PPI displays, you have more options. Because fractional scaling at higher PPIs works quite well, you can really get any monitor size and configuration you want. But it helps to be as close to 2x your desired PPI as you can, and ideally exactly that. This won’t be possible for some people, like me: I feel best around 90-100 PPI, and the only monitors that hit exactly double that do not support refresh rates over 60hz. So, I have no choice but to scale my UI. If you like a more standard PPI like 110, for example, you have options, notably 5k 27" or 6k 32" monitors at a perfect 2x scale, or 27" 4k or ultrawide 5k2k monitors at a 1.5x scale.
If you’re working in a more popular range—4k 27", 34" 1440p ultrawides, 24" 1080p, 27" 1440p—you can be a little picky. Some monitors have ultra-high refresh rates, others have a built-in USB-C hub to dock your laptop (my favorite!), and a few have built-in webcams and nice speakers. You can also choose the panel type: IPS for better viewing angles, less ghosting, and more color accuracy, VA for much superior contrast.
Step 5: set up the monitor
Once your monitor is delivered, it’s time to set it up. If your monitor is high-DPI, you don’t need any extra programs. If it’s low-DPI and you want to scale it, install BetterDisplay. The first thing you should do is check the panel for dead or stuck pixels: plug it in, turn it on, connect it to your computer, and start a dead pixel test like this one. Flip through the colors and see if you spot a black or white pixel that sticks out from the crowd. If you do find one (and you’re sure it’s not just schmutz on the display), document it and return the monitor for another one. Amazon is pretty lenient with returns and will consider a single dead pixel an out-of-box issue. Other retailers may not let you return it until you hit a certain number of dead pixels. If you buy a second-hand return from Amazon (boo, don’t do this!), you are quite likely to get dead pixels or some other issue like backlight bleed because Amazon doesn’t check their returns for them. I got burned by this and had to return the monitor—I should have paid full price for a new monitor from the start.
Once you have confirmed the monitor functions as expected, make sure it can display at its native resolution and your desired refresh rate. Go into Settings, then Displays, and click on your new monitor. Choose the resolution that says “Default” and change the refresh rate to your liking. If you choose a resolution or a refresh rate and the monitor blinks out for longer than a couple seconds, your cable or device likely can’t handle it. Consider switching your connection method (HDMI is notoriously limiting) or upgrading your cable. DisplayPort has been most consistent for me, and I suggest you use DisplayPort through USB-C if you have the option.
You may even find that your cable can push more pixels than expected—that’s great! I was shocked to find out that my 4k 120hz USB-C monitor can both display perfectly on my M1 MacBook Air (it’s not advertised to!) and push gigabit ethernet through its extra USB lanes (it shouldn’t be able to!).
Finally, you can mess with the scaling. If you’re satisfied on the default scaling, perfect. You don’t have to worry about lost performance or artifacting. But if your UI is too small or too large, like it likely will be on a 4k 27" monitor, click between the “larger text” and “more space” options in the Displays panel. If you need more fine-grained control, the “Show resolutions as list” option from before will give you some more in-betweeners.
Step 6: profit?
That’s it—3000 words is way too much for a monitor buying guide, but I hope it helped you get a better understanding of how monitors work on MacOS. Enjoy your new perfectly-scaled monitor!